Today I'm going to show you how to automate the Build process of Android app using CircleCi. For automation, we will be creating a simple Continuous Integration & Continuous Deployment aka CI/CD pipeline which will build entire Android Project & give you an output of Android APK & App bundle.
We will be using CircleCI for creating cicd pipeline, Github git repo for storage of source code & Android studio IDE. this will be simple step by step guide easy to follow for anyone, so let's get started.
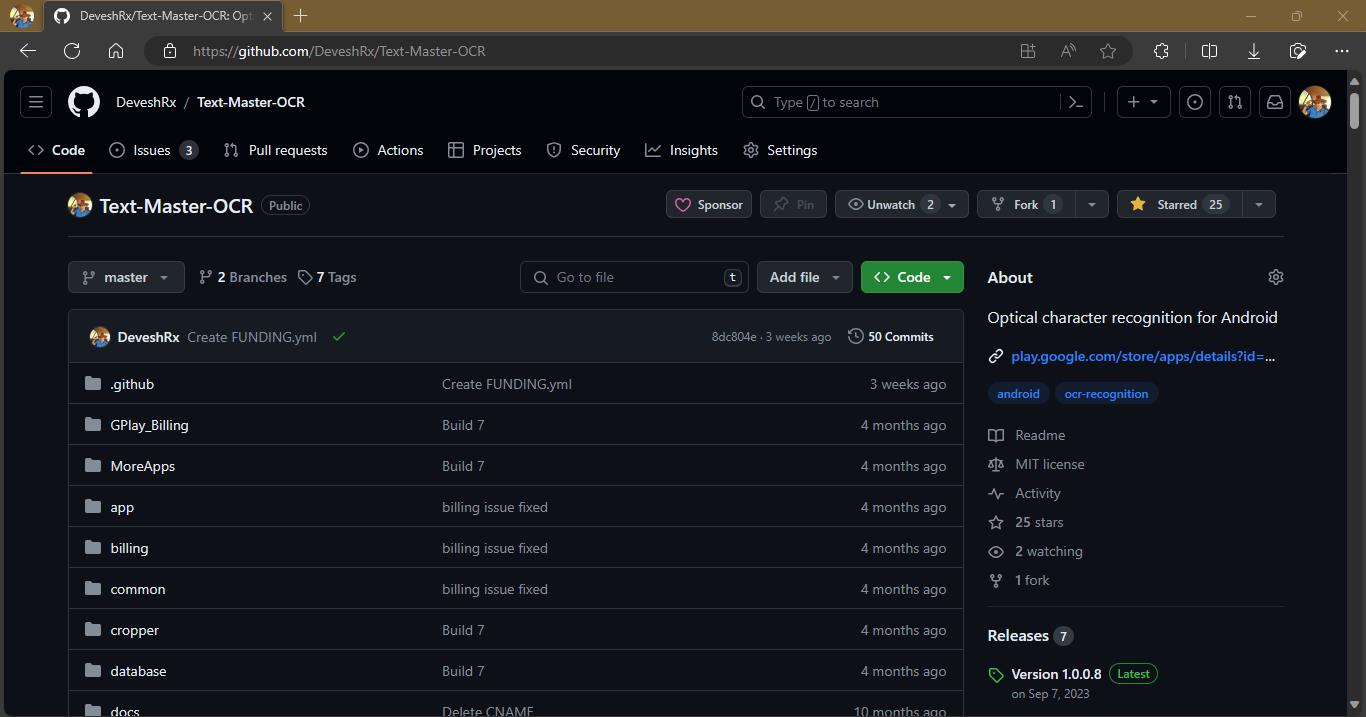
For this Video, i will be using my own Android Open Source App Project "TextMaster",
this app is also available on Play Store if you are interested in AI base Text Recognition. Source code is available on github. Link is in the description.
now git clone the entire repository from github,
and then open it in Android Studio.

Create Config.yml for CircleCI
now we have our android project ready to build. As you know we are using circleci, we have to add a configuration file in root directory of project.
Create a folder & name it ".circleci". under this folder create a configuration file named "config.yml".
this is YAML file so you have to use YAML Language to write the code in it. open that file. this file is essential for circleci because in this file we will write all the commands to execute the build process in proper sequence.
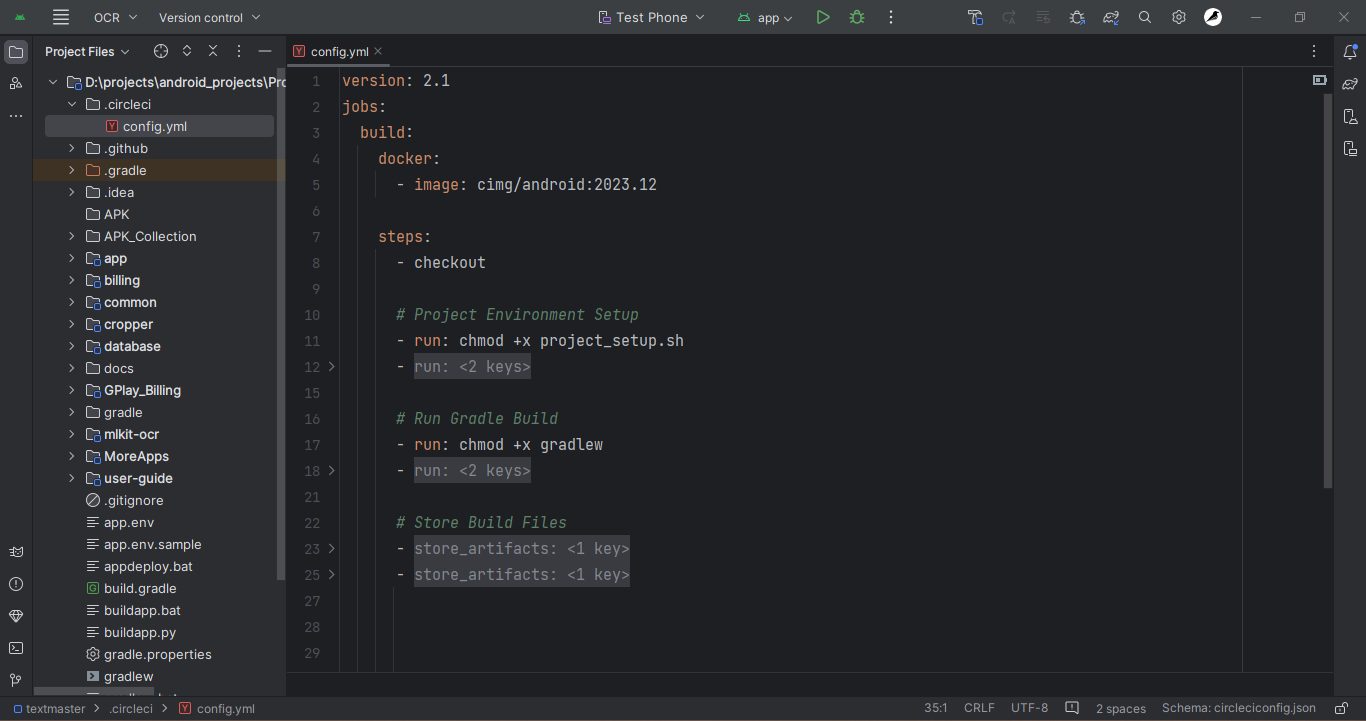
now we will add config code in it for circleci to execute it.
first line will always going to be version name then we will add jobs section and under it write name of job.
inside this job name "build_my_app" we will add docker configuration, since we are using android, we have docker image for android "cimg/android" followed by version number of it.
now we have to mention steps for execution of build commands, write the word "steps" & under it first is checkout step which is required by default.

first we have to execute project setup file, this will be a shell script file & for it we will add a run command, we will write the code in this file in later part of video.
first we will change the file permission to executable & then 2nd is to execute & run the project_setup.sh
next step is to start the android gradle build processs, for this just write the gradle command followed by task "clean", "assemble" & "bundle".
and don't forget to change the permission of gradle file before starting build process.
This will run Android gradle build in our project.
Once the gradle build is completed, you will have to get the android apk & app bundle files out of circleci machine as an artifact.
CircleCI has this feature to pull out files & folder from machine after build is finished, in this way we can get the finished output which is Android APK & app bundle File.
it is very simple, just write "store_artifacts" & mention the path of file or folder. in this way we will put out the apk & bundle folder after the build is completed.
now our configuration file is ready for CircleCI. first it will run shell script file for project setup, then we run android gradle build & finally when build process is completed, we pull out android apk & app bundle files which are stored in output folder.
Create CircleCI Project
Now we will sync this changes with our github repo. once you have all the changes saved to git repo, next step is create a CircleCI account.
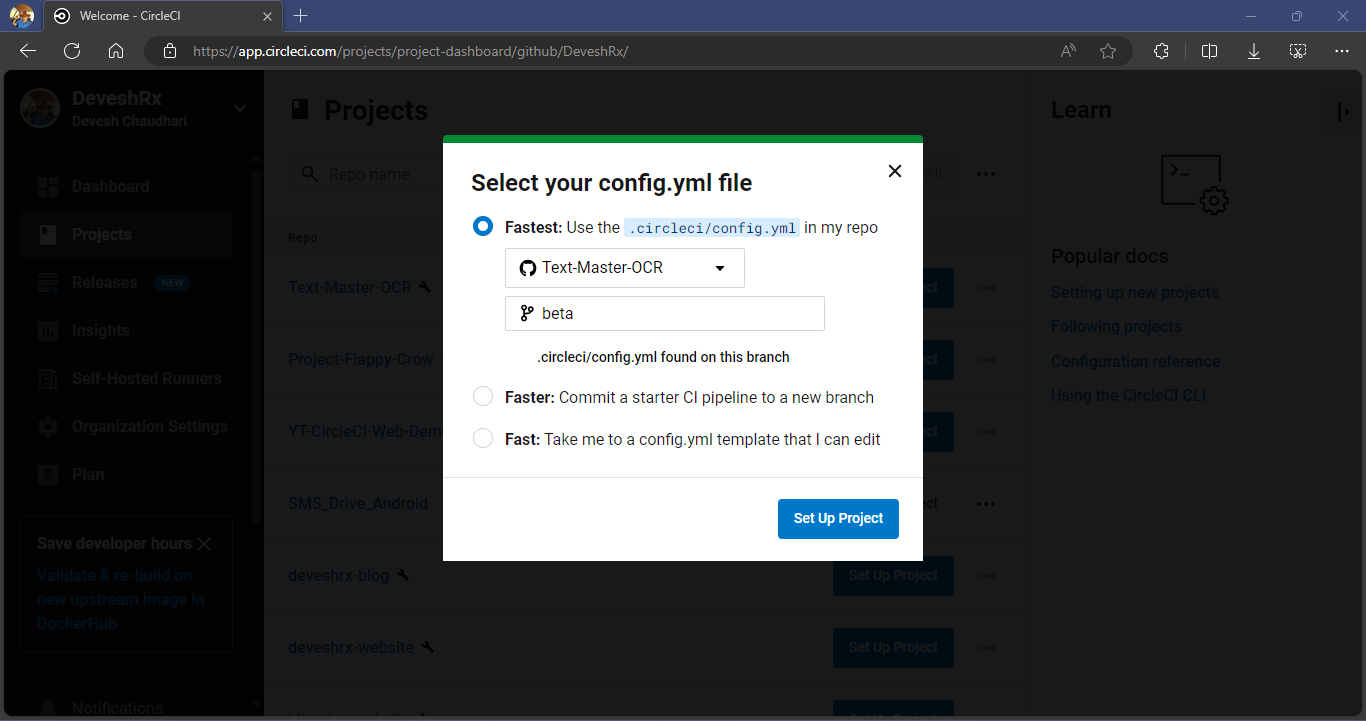
open the dashboard after signing in, go to Projects option. find your repo in list and click on setup project button.
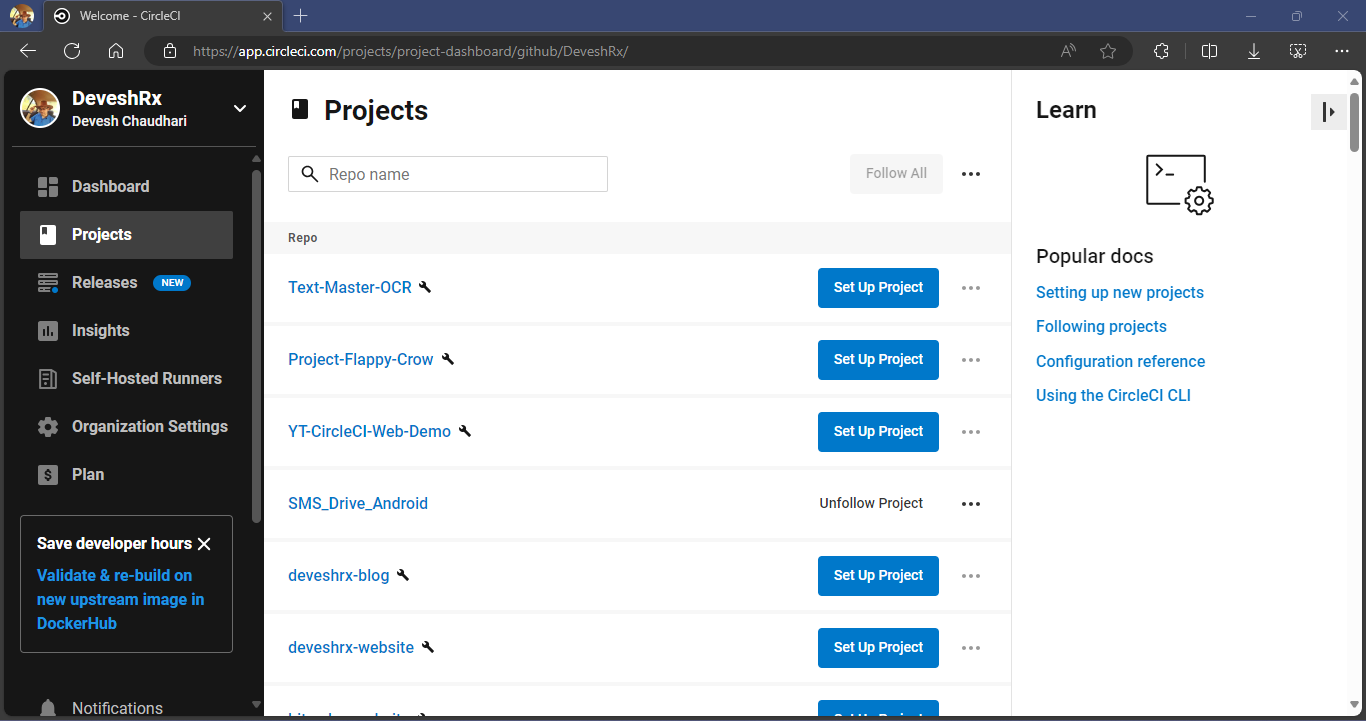
if you have saved config.yml file in ".circleci" folder then it will automatically recognise the file. click on "setup project" button.
now your github repo is connected to circleci and it will automatically start build process but the build process will fail because remember we have not synced our environment variables & other sensitive files such as android sign key, google services json file & other API keys in our github repo for safety & security reasons.

but we need those file to build android app so what are going to do is, we will dynamically create those files in our circleci machine during build process & this is exactly what we are going to do next.
Create Base64 String Environment Variables
next step is to create base64 string of all sensitive files in project so that we can use them as environment variables & generate those files during build process.
first you have to locate all the sensitive files like .env file, google services.json, google credentials json file & Android Sign key etc and convert them into a base64 String. you can use any tool to convert these files into a base64 string. Just make sure there is no space or gap in between words, it should be in one single line.
for this video, I have copied all sensitive files from project folder into a separate folder & convert these files into base64 string which is saved in plane text file.
Now open CircleCI Dashboard & go to Environment Variables section under Project settings.
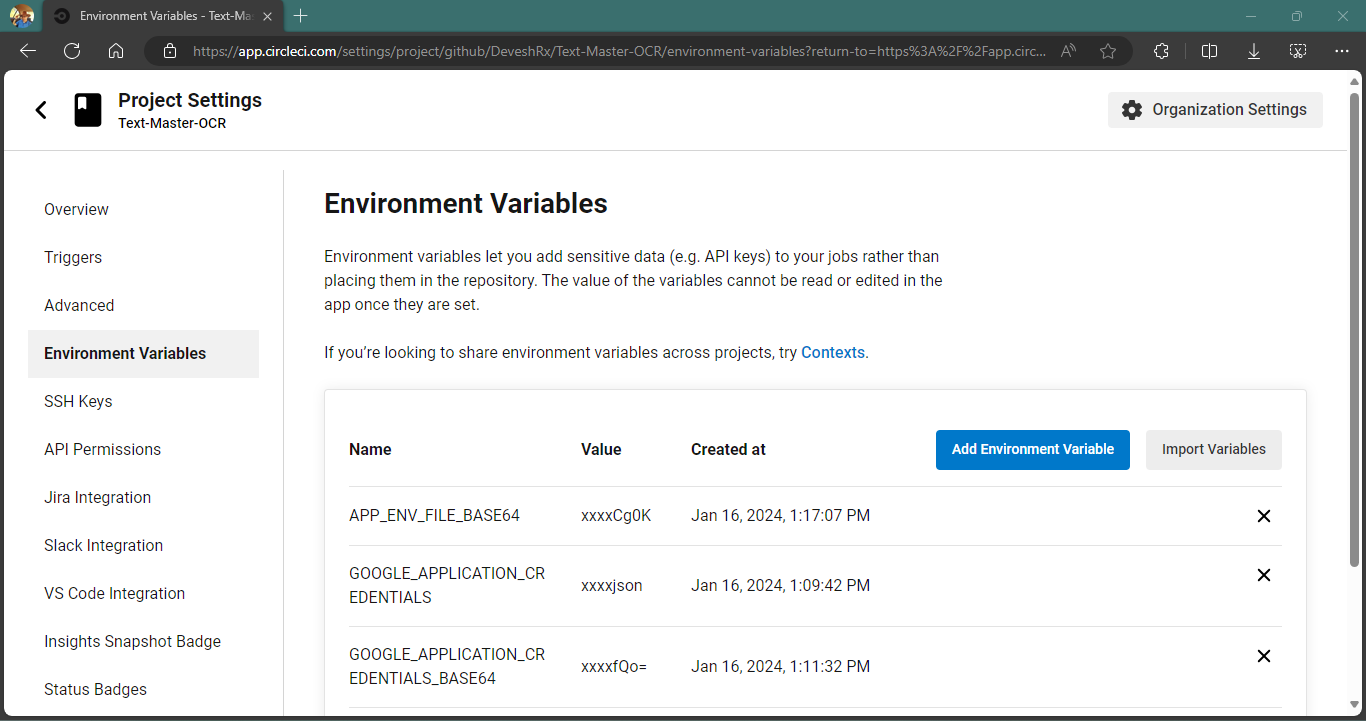
one by one add all the base64 strings along with name of Environment Variable so that we can access them during build process.
now we have successfully setup our environment variables in CircleCI project.
Setting up Project files via shell script file
next step is to write the shell script code in project_setup.sh file, remember this file which we have mentioned in config.yml to execute before starting android build process. open the file, if you are familiar with linux terminal command then this should be easy for you.
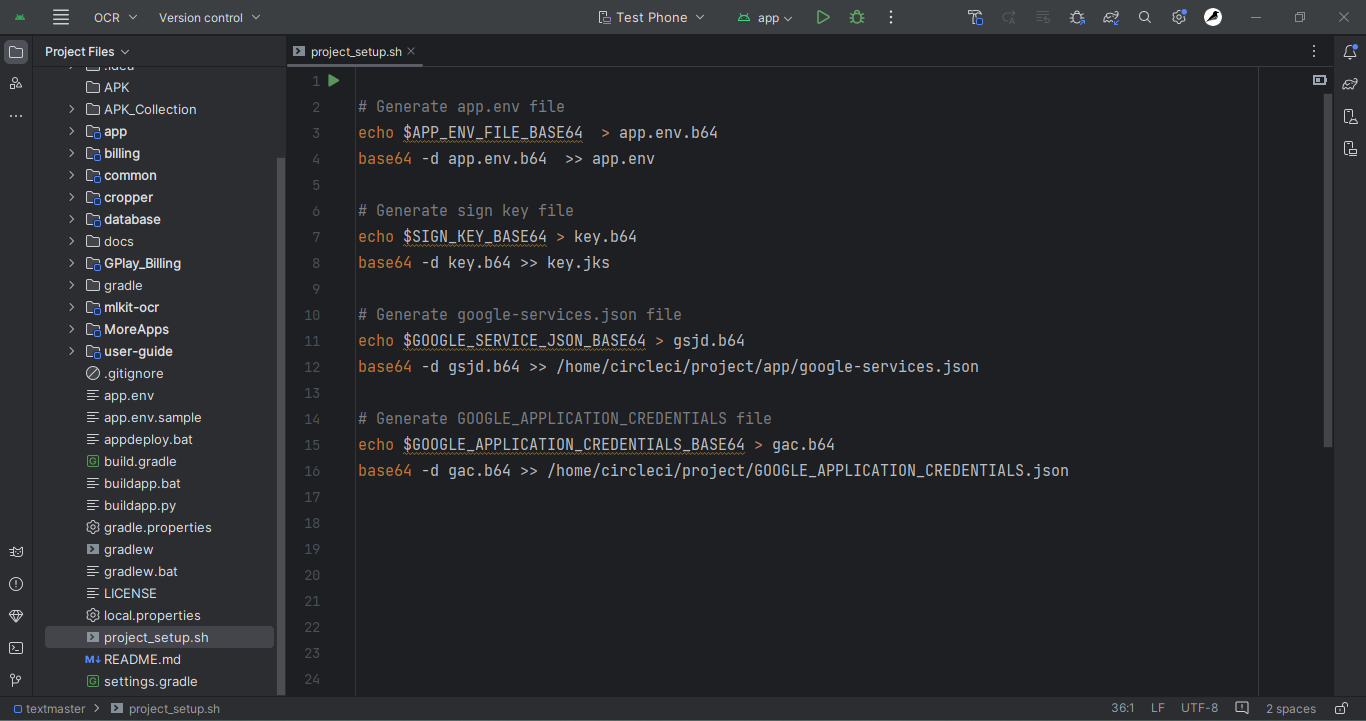
we will use the environment variable name to get the base64 string & save it in a file with extension .b64.
next will we decode that base64 string from the file & save it in appropriate location as a new file with it's actual file name.
we will write the shell script code for each & every file to decode it, here we have total 4 files, in your case you might have more or less depending on your project.
CircleCI Build Initiate
save the file project_setup.sh in root directory of project and sync all the changes to github repo. as soon as your git repo sync is completed you will notice that CircleCI will automatically start the build process for your android project.
Now sit back, relax & wait for few minutes for build process to finish. Entire Android Build Process is running on cloud server of CircleCI.

after completing build process, you will see green sign of status as success which means we have successful build the android project & the output which is android APK & app bundle are stored in artifact for download.
You can download android apk & app bundle files from artifact tab.

now we have successfully create a simple CI/CD Pipeline where you can make changes to android app source code & then upload it on github repo. CircleCI will automatically fetch new changes and start the build process. once the build process is complete you will have android app apk & app bundle of new app update ready to download & install on your phone. This is just the basics but you can do more complicated automation tasks like testing of app on virtual device & much more using CICD pipeline.
That's it for today, I hope you learn something new, if you like this video make sure to smash the like button & subscribe to my youtube channel for more awesome videos.
Have a nice day & by bye